![Simpled Logo Size-1.jpg]](https://learn.simpled.uk/hs-fs/hubfs/Simpled%20Logo%20Size-1.jpg?height=50&name=Simpled%20Logo%20Size-1.jpg)
Key Features
- Multiple Unlocking Options: Unlock via Bluetooth, fingerprint, passcode, proxy fob, emergency key, or voice assistants (Alexa/Google Home with Wi-Fi bridge).
- Weatherproof (IP55 Rating): Built to withstand the elements, perfect for both indoor and outdoor use.
- Auto-Lock: Never worry about forgetting to lock your door. The lock will automatically secure itself after unlocking.
- Passage Mode: Keep the door unlocked temporarily—ideal for gatherings or when you need constant access.
- Timed eKey Sharing: Easily share timed eKeys or passcodes for guests, making it simple to manage short-term rentals like Airbnb.
- Handles Reversible: The lock fits doors that open left or right.
- Durable Design: Constructed from SS304 for a long-lasting finish.
| Materials | Handle: ADC12 Panel: SS304 |
| Weight | 2.2kg |
| Unlocking Methods | Smart Phone Apple Watch Fingerprint Passcode Proxy Fob / Phone Tag Emergency Key Alexa (needs gateway) Google Home (needs gateway |
| Colour | Silver - Black |
| Low Battery Alarm | Less than 4.8 v |
| Doors Applicable | Aluminium Door Wooden & UPVC Door |
| Working Voltage | 6V/4 x AA Batteries |
| Door Thickness | 40-80 mm (For more, you need Longer spindle and Screws) |
| Data Capacity | Fingerprint: 200 Passcode: 150 Fob/Stickers: 200 Unlimited eKeys |
| Working Temperature | -10 to 55°C |
| Exterior Weatherproof | Yes |
What’s Included
- 2x Proxy Fobs
- 1x Phone Tag (Sticker)
- 2x Emergency Keys
- 2x Sliding Screws
- 4x Mortice Screws (for Wooden & Aluminium Doors)
- 1x Spindle (60mm to 95mm)
- 4x Alkaline Batteries
- 2x Rubber Gaskets
- Spindle Alignment Tool
- 24-month warranty
Smart Lock Integration
- Without Gateway: Use your smartphone to unlock and share keys.
- With Gateway: Control your lock remotely, view access logs, and integrate with Alexa/Google Home.
Installation
Follow these simple steps to install your Simpled SS Slim Smart Lock (refer to the diagrams below):
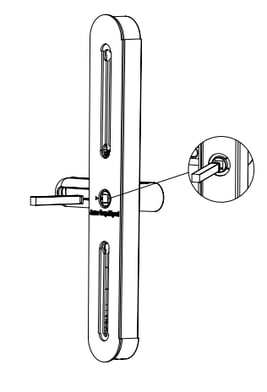
1. Adjusting the Latch Bolt for the Mortice
Note: This adjustment is required only for doors without a multipoint mechanism and when using the Simpled mortice - If your existing multipoint lock is compatible with the Simpled Smart lock, skip this step.
a. Push Upward and Press Tightly
(Optional: For those who purchased the mortice, sold separately.)
b. Insert the Latch Bolt into the Mortice
Firmly push the latch bolt into the mortice slot.
c. Rotate the Latch Bolt 180° (If Needed)
If the latch direction isn’t suitable for your door, adjust it by following the steps shown in the below image.

2. Selecting the Correct Spindle and Screws for Your Door
Select Spindle & Screws: Choose based on door thickness and use the spindle alignment tool.
a. Measure Your Door’s Thickness
Use a ruler or measuring tape to determine the exact thickness of your door.
b. Choose the Appropriate Spindle and Screws
Refer to the sizing table to select the spindle and screws that match your door’s thickness.
| Door Thickness | Spindle Size | Screw Size |
| 40-45 mm | 60 mm | 35 mm |
| 45-50 mm | 65 mm | 35 mm |
| 50-55 mm | 70 mm | 35 mm |
| 55- 60 mm | 75 mm | 50 mm |
| 60- 65 mm | 80 mm | 50 mm |
| 65-70 mm | 85 mm | 50 mm |
| 70-75 mm | 90 mm | 60 mm |
| 75- 80 mm | 95 mm | 60 mm |
c. Attach the Spindle
Insert the grooved end of the correct spindle into the spindle receptor on the outside panel, ensuring it clicks securely into place.
3. Fix Sliding Stub: Attach the rubber gasket and secure it with screws.
a. Fit the Rubber Gasket
Place the rubber gasket onto each panel, ensuring a snug fit.
b. Attach the Sliding Screws
Secure the flat-head sliding screws to the stubs in both the top and lower positions, aligning them with the door holes.
Ensure the spindle-to-top stub distance is between 60–130 mm and the spindle-to-lower stub distance is between 60–110 mm.


c. Align the Spindle Receptor and Gasket
Rotate the spindle receptor so that the arrows on both the receptor and the rubber gasket point toward each other before installation. Proper alignment is crucial for a secure fit.

4. Install the Front Panel
Ensure the central spindle hole, stubs, and cable are properly aligned. For older doors, the euro cylinder hole can be repurposed for the lower stub.
Installation Steps
a. Measure and Mark
Measure the distance from the top hole to the spindle and from the spindle to the lower hole.
Mark the positions for the top and lower stubs.
b.Secure the Stubs
Attach the stubs firmly at the marked locations.
c. Prepare for Cable Placement
Drill a cable hole if necessary, and use masking tape to hold the handle in place temporarily.

d. Drill Holes (If Needed)
For multipoint mechanisms, clear space to drill the top and lower holes.
If a cable hole is required, remove the multipoint mechanism by unscrewing it along its length.

e. Align Components
Align the arrows on the spindle receptor and rubber gasket before final installation.
5. Inner Handle Installation Steps
a. Attach the Rubber Gasket
Fit the rubber gasket onto the inner panel.
b. Position the Interior Plate
Place the interior plate on the spindle and pass the cable through the designated hole.
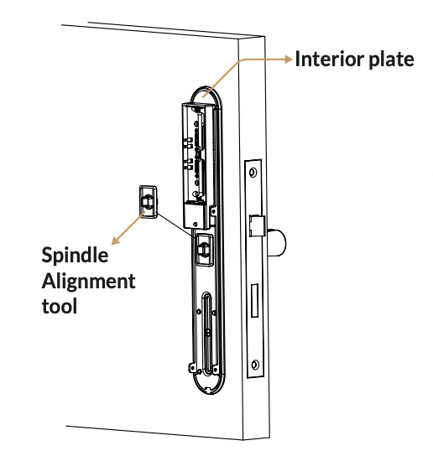
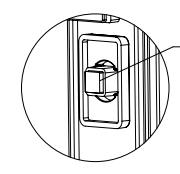
c. Align the Spindle
Use the Spindle Alignment Tool to centre the spindle in the interior plate holes.
d. Secure the Stubs
Tighten both screws to secure the stubs in place.
e. Connect the Cable
Attach the cable to the socket securely.
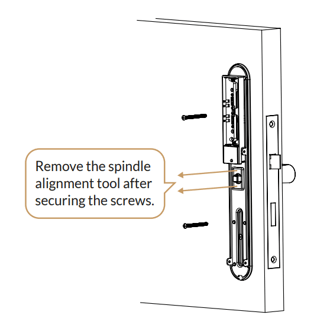
f. Remove the Spindle Alignment Tool
Once the screws are secured, remove the Spindle Alignment Tool.
Step 6: Install the Battery
Installation Steps:
a. install the Batteries
Insert four AA batteries into the compartment.
b. Attach the Back Panel
Secure the back panel to the handle.
c. Tighten the Screws
Fasten the four side screws to secure the panel.

Testing:
- Handle Test: Lift the inner handle to engage deadbolts/hooks. Pull down to disengage.
- Outer Handle Test: The outer handle should move but not retract the latch. Use the emergency key to test proper latch retraction when lifting and pulling down the handle.
Auto-lock Feature:
- The lock will automatically relock after a preset delay (default: 5 seconds). Adjust the delay in settings.
- Leaving Routine: Lift handles to engage the deadbolt. The lock will relock if auto-lock is enabled.
Cleaning:
Use a soft, damp cloth. Avoid chemicals to protect the lock’s finish.
Congratulations! You’ve successfully installed your Simpled Smart Lock!
Why Choose the SS Slim Series Smart Lock?
- Secure & Smart: Multiple access options for ultimate convenience.
- Sleek & Weatherproof: A slim, durable design that fits any modern door.
- Easy Management: Easily share keys, track access, and lock remotely.
Upgrade to the Simpled SS Slim Smart Lock for a seamless and secure door experience. Check out our installation videos on our YouTube Channel or reach out via Live Chat for support.